


Moss’s two new kits improve TR and MGB stopping power
They don’t build ’em like they used to. Thankfully, today’s sportscars start and stop infinitely better than those built in previous generations. With this in mind, Moss Motors’ engineering department has been working diligently on ways to adapt modern technology to older British sportscars to improve safety and the overall driving experience. Two new front disc-brake kits are the fruits of some of these labors.
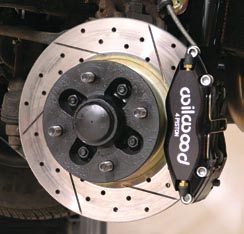
Using upgraded modern components, these new kits improve stopping power in the TR4A/TR250/TR6 (Part # 586-718) and 1962-80 MGB (Part # 586-628). Four-piston calipers and heavy-duty pads increase clamping force, and cross-drilled/slotted rotors stay cooler to fight fade and evacuate brake dust and road dirt for a more consistent friction surface. The kit’s DOT-compliant braided-steel hoses are more durable than standard rubber hoses, and they also provide a firmer pedal feel.
These kits were designed to be installed by the do-it-yourselfer. In addition to regular SAE and metric wrenches and sockets, the job is eased with crescent wrenches, vise grips or line clamps, and line (flare-nut) wrenches. The TR kit also requires the backing plates to be trimmed.
If the car’s brake fittings haven’t been touched in years, spray penetrating oil on them ahead of time to lessen the likelihood of rounding the nuts’ shoulders. Also, realize that brake fluid eats paint, so be cautious when removing the old parts and when adding new fluid to bleed the upgraded system.
These photos show highlights of a Big Brake installation on a TR. Complete instructions are online at www.mossmotors.com.
To improve stopping performance and increase pedal feel, the Moss MGB system utilizes alloy Wilwood 4-piston calipers with dust seals, heavy duty pads, cross-drilled/slotted rotors, and braided-steel hoses.

1. Installation of the upgraded Moss 4-piston TR brake kit: Raise and secure the car and remove the front wheels. Then disconnect the left-front soft hose at both ends. Plug the hardline with the kit’s stopper to keep fluid from dribbling onto paint, and save any stock lock-clips and other hardware.

2. Loosen the fitting at the brakeline retaining bracket.

3. Remove the lower caliper bolt first, then hold the caliper while loosening the upper bolt. Pull the caliper from the splash-shield and spindle mounts, then remove it from the rotor. Save all brackets and spring washers.

4. Wiggle off the hub dust cap with vise grips. Then remove the cotter pin (if equipped) and the spindle nut. Remove the rotor/hub, saving the bearing and washer.

5. Secure the lugs in a vice if necessary, then unbolt the hub from the rotor. Save the lockwashers.

6. This is an opportune time to repack the bearings or replace them and their felt seals. Moss Motors stocks the necessary replacement parts.

7. Clean the new Moss rotor with brake cleaner. Then use the stock bolts and lockwashers to bolt the existing hub to the new rotor, torquing the bolts in a criss-cross pattern.

8. Slip the backing plate off the spindle, rotate it to clear the caliper-to-spindle mounting bracket, then remove the plate.

9. Clean the backing plate, then use the kit’s template and mark where the plate will need to be cut.

10. Use a cut-off wheel, nibbler, and/or die-grinder to trim the backing plate. File any sharp edges smooth.

11. Test-fit the modified backing plate with the spindle, bearing, hub/rotor assembly, and caliper. Re-trim the backing plate if necessary to create more clearance, particularly in the caliper area.

12. The kit’s calipers are marked Left and Right. Mount the caliper with the bleeder screw facing up. Then mount the L-shaped brakeline bracket horizontally.

13. Check again for interference between the caliper and backing plate.

14. Torque the spindle nut to factory spec, then install a cotter pin if the original setup used a castle nut. Pack the dust cap with grease and tap it into place.

15. Install one of the kit’s braided brakelines: Hand-thread the end with a 90-degree bend into the caliper.

16. Route the hose between or over the coil to clear the spring during suspension movement. Move the line’s crimp to its line locator and use the kit’s hardware to secure to the factory retaining bracket.

17. Use line wrenches to tighten the hose. Then spin the rotor to verify clearance between it and the pads’ anti-squeak spring.

18. Repeat the process for the front-right side. Then install the rear hose(s).

19. IRS TR takes two rear lines; live-axle applications have a single rear line. Finish the job by bleeding the brakes, checking for leaks, then bed the brake pads following the kit’s instructions.
By Eric Wilhelm

'Bigger Brakes' has no comments
Be the first to comment this post!