


Despite their solid appearance and considerable weight, cylinder heads are actually rather fragile. A brand new head will be ruined in a short order if improperly installed. This guide is reprinted from BMC’s Gold Seal engine instructions. Never attempt major repairs without a workshop manual.

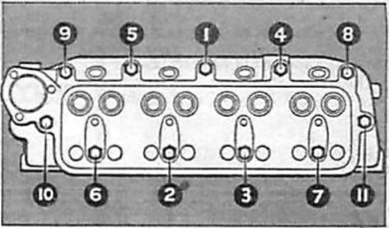
Check workshop manual for torque sequence on your specific cylinder head
It is important to avoid the re-use of very old and badly worn parts as they may result in damage or loss of performance.
If in any doubt as to their efficiency then replace with new parts. Never re-use gaskets or lockwashers.
When the cylinder head assembly is installed, the following checks and adjustments should be made:
Coolant
Fill the cooling system using an appropriate concentration of anti-freeze in the water (Refer to vehicle manufacturer’s specification. Some companies supply different types of anti-freeze for cast iron heads and alloy heads.)
During the engine warm up period, the pressure cap must be in position at all times. In the case of sealed systems, the level should be checked in the expansion tank after the unit has cooled down.
Initial Running
The engine should be allowed to warm up for 15 minutes at approximately 100 rpm and then switched off. Whilst still hot, the cylinder head nuts hold be re-torqued to the vehicle manufacturer’s specified torque, using an accurate torque wrench in the correct sequence. The valve clearances should be readjusted following the re-torquing of the cylinder head.
The correct ignition timing must be set. Inaccuracies can result in premature engine failure. The carburetors hold be adjusted to the correct idling speed and mixture setting.
Servicing
On completion of 1000 miles, the following operations should be undertaken:
- Check tightness of coolant hose connections.
- Check fan belt tension.
- Checking timing belt tension (where applicable).
- Check engine idle and mixture setting.
- Check coolant level.
- Re-torque cylinder head.
- Check valve clearances and lock nut tightness.
- Check torque of manifold fixings.
If the cylinder head replacement is due to a problem associated with overheating, the following checks and actions should be carried out:
Radiator
The radiator should be thoroughly flushed out with cold water and checked for leakage identified by coolant stains. A blocked radiator will have tubes which can be felt to be cooler than the remainder when the engine has reached its normal operating temperature. Clear the cooling fins of any debris that will restrict air flow through the matrix.
Ensure that the radiator cap is of the correct type and pressure.
Thermostat
For maximum efficiency the temperature is maintained within certain limits by the thermostat.
Check that the thermostat is opening at its prescribed temperature by immersing in water raised to the temperature stamped on the body. DO NOT boil the water.
If the cylinder head replacement is due to a problem associated with either incorrect fuel/air mixture setting, the following checks and actions should be carried out:
Carburettor
The carburetor should be examined for wear on the spindles and linkages and the fuel inlet valve need and seat.
Unless you are fully conversant with the workings and adjustment of the jets and mixture screws, it is best left to an expert after the engine is running.
'How to Install a Cylinder Head' has no comments
Be the first to comment this post!