


Well sports car fans I am learning many lessons while putting together my Triumph Spitfire 4. Lesson number one is there are slightly more complications when you use equipment other than original parts for a specific year car. Interesting and challenging but with pitfalls. Lesson number two:  get people that know what they are doing to help you with your project. Lesson number three: be very careful when you are ordering parts from a British Parts Supply Company (review your order carefully before submitting it online). Errors in these three areas can be costly and time consuming to correct.
I ordered an exhaust manifold from a parts house for the Spitfire 4 MK2. The engine I am using is from a MK3 Spitfire. The engines are very similar except for the head. The head was changed on the newer model engine (which made it a better running engine, by the way). I knew that! But I didn’t understand the impact on the exhaust manifold until I took it out of the shipping box and put it up to the head. Oh no! It didn’t fit and can not be easily modified to fit. Cha-ching! I had to order a completely different system because of the slightly different head. Not only that, I had the old manifold off the MK2 parts car and could have easily put it up to the engine and seen the difference before ordering. I didn’t. I had to call and ask if I could send the manifold back, which was agreed too. I am out the cost of shipping here and back of course. Geez!
I knew nothing about putting a ring gear on an expensive custom built lightened flywheel. Now I do. After witnessing first hand, the process of actually putting the ring gear on the flywheel, I don’t recommend putting the flywheel in the freezer and the  ring gear in your wife’s stove. The idea was already risky, as in needlessly irritating your wife, which I try my best avoid but don’t usually succeed at. The reason I do not recommend this method is you can not control the heat expanding the ring gear as closely as you need too. Besides, you don’t need moisture condensing on your nice new shiny flywheel. In this case, I would say the process is somewhat similar to having a heart surgeon work on your heart that has done the same thing over and over. Don’t mess around. The chances for error are abundant as this is a fairly precise operation.
I have a friend that comes to our car club meetings. His name is Blair Engle. Blair is a retired Research Design Engineer in the Physics Department of Florida State University.  He is a Moss representative and has had a MGTD for most of his life. He specializes in meticulously rebuilding SU carburetors and has put many ring gears on flywheels. How many is that? Well you would have to ask him. After watching him put mine on, I believe him. It is people like him that make me realize why I am glad I belong to a British Sports Car Club. Of course knowing others that have the same mental disease as I do helps too. It is comforting you know.
Blair used an acetylene torch to heat the ring gear so that it would have exactly the amount of expansion needed to fit on the flywheel. By the way, yes Blair has a smashed up finger in the pictures. He caught his hand on the door handle as he was closing the door of his Mini Cooper.
The flywheel is placed face up on a flat expendable shop table (not the kitchen table). Check the gear teeth of your old flywheel if it is still on the engine and look where the teeth engage the starter.  Does the starter point toward the front of the engine? If the flywheel is no longer on the car, the chamfer (slant) of the teeth should point toward the transmission so that the gear will slide into the teeth of the starter to crank the engine. Logical huh? The flywheel only goes on the engine one way. If you put the ring gear on backwards it will have to be driven with just the right force all the way around until it comes off without warping the ring gear. People have been known to put ring gears on backwards. See, I told ya in “lessons learned” to get somebody that knew what they were doing to help you with this type of operation.
 A metal rod is clamped to the table. The ring gear is hung on the rod, therefore less surface area to sap heat away from the ring gear. The rod should be on the longish side (approximately two feet), so that the ring hangs about one foot from the bench. This should keep the flame of the torch from damaging the table (as in does not set the table on fire). Always a good thing. Use protective welding gloves when handling hot metal.
The diameter of the fly wheel needs to be carefully measured and a small pencil size rod called a “go/no go” tool is cut the length of the inside diameter plus 1/32 of an inch. The go/no go tool length is critical. It must be rounded off on each end to slip between the edges of the inner circle of the ring gear.
Heat the ring gear all over with the torch. Continue heating and checking with the metal pencil rod until it fits within the sides of the ring gear. The rod should rattle back and forth in the heated ring gear.
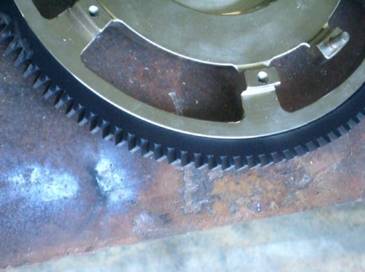
 Once the ring gear has expanded, with your heat protective welding gloves on your hands, grab the (hot!) ring off the rod and put it around the flywheel. Prest-o change-o the ring gear should fit perfectly placed on the flywheel.
The Temple of Triumph, Blair and yours truly are not responsible for problems resulting from information in our newsletters. We are only trying to provide some insight into our experiences as we attempt to make our cars run.
 Special thanks to Obin Hamrick for use of his table, vise and torch in this demonstration.
By David Knopf
David Knopf is the webmaster and newsletter editor for the Temple of Triumph club in Tallahassee, Florida.
Visit the Temple of Triumph.


'Installing a Ring Gear on a Flywheel' have 5 comments
July 16, 2012 @ 4:56 pm Chris Conrad
Good article, David.
Regarding putting the ring gear on backwards: Keep in mind the beveled edge should be on the side that the starter pinion is. If you use an aftermarket gear-drive starter, which pushes the pinion into the gear from the engine side, rather than drawing it in from the trasnsmission side like a stock Lucas starter would, you may want to install your ring gear backwards to avoid excessive wear.
July 27, 2012 @ 7:48 am Steen Sorensen
Great and well written article. Now any good tips on how to remove the old ring gear from a stock flywheel?
September 27, 2016 @ 1:09 pm mbrosch
You drill it from the side and crack it with a chisel. Comes right off.
July 31, 2012 @ 3:36 pm Ron Lawrence
This brings back memories. I put the flywheel in the freezer overnight and the ring gear in the oven on broil (leave the door open a little so you don’t break the glass in the door). Get the ring gear good and hot. Make sure to turn everything the “right side up” and work quickly. We put a heavy piece of plywood in the middle of kitchen floor. Have one person take the flywheel out of the freezer and the other take the ring gear out of the oven. Again, work quickly. It dropped right on for my ’67 mgbgt.
August 18, 2012 @ 12:41 pm Walt Reid
On my friends TR3A (with a TR4 motor) and an aluminum flywheel, we bought a cheap toaster oven that was big enough for the starter ring to fit in; I didn’t want to incur the wrath of “she who shall be obeyed” by using the oven at home. I put it in on high for about 20 minutes. I made some alignment bolts by cutting the heads off of two bolts, and cutting a slot in them for easy removal later. Screwing those in, took the heated ring gear and it slipped right on. After letting it cool for some time, we bolted it down, then heated the whole assembly enough so it would slip onto the crank end, as that was several thousandths from fitting.