


Do it yourself and save $500—and your shoe’s soles?
By T. Keith Vezina, British Motoring Club New Orleans
Floor pans are one of the most rust-prone areas of British sportscars. Rust has a way of hiding and prospering under carpeting. Once rust is discovered, carpeting becomes a way to keep it out of sight and temporarily out of mind. But ignoring rust doesn’t make it go away. The sooner rust is dealt with, the less likely it is that the car will ever develop Fred Flintstone syndrome.
My ’76 MGB’s floor pan was badly rusted. I went to a local professional restorer, who quoted $500 plus parts to do the job. He gave me a lot of free tips, and I decided to do the job myself. When I finished, I went back and told him he isn’t charging enough!
A few of the major steps are shown here. (We didn’t put down the tools and photograph every procedure, particularly the ones that take place under the car.) Afterward, you might treat yourself and your B to new sound-deadener and carpet.
Replacing rotting pans won’t win you the Nobel Prize for curing cancer, but you can take pride in knowing that your car’s floor is rust-free—for now.

- This cancer is malignant. MG engineers likely didn’t have bonus ventilation in mind when they designed the B.

- Both OE and reproduction floor pans are available for the MGB from Moss. The OEM replacement pans (458-885, 458-875)—one per side—have the nuts for the seats and the studs for the brake and fuel line clamps already welded in place.

- Instead of welded-on nuts and studs, replica pans (458-950, 458-955) have an extra 1” vertical lip of sheetmetal all around.

- Replica pans were chosen here because of their extra “meat” for the rusted-out transmission tunnel sheetmetal.

- Before cutting out the old pans, measure and re-measure the locations of the seat nuts and line clamp studs. Transfer these dimensions to the new pans.

- We began by raising the car as high and level as possible before securing it on jackstands. From underneath, we then drilled holes at the edges of obstructions. We used these holes as a guide when cutting out the old pans from above.

- Using an air-powered body saw, we cut out the old pans.

- After removing as much as possible with the body saw, we attacked the spot welds with an air chisel. We put the chisel between the remaining floor pan sheetmetal and the body sheetmetal. (Be careful not to cut the latter.)

- Once the pan was out, we ground all of the spot welds smooth and sanded the rusty metal.

- Use the seat rails to locate the seat nuts perfectly. If you don’t get this right, you’ll have to slot the seat-rail holes.

- Because of crossbrace interference, the seat nuts must be welded onto the new repro pan before it can be installed.

- On the replica pans, we trimmed away most of the vertical sheet metal. We left it only where we had rust-throughs on the body.

- After several fit-and-trim procedures, we marked the edges of the body sheetmetal and braces on the pan from underneath. Using these marks, we drilled 3/16” holes about every 1.25 inches for spot welds.

- To assure good welds, we used two hammers (one under the panel as a backup) to flatten the drilled holes.

- We used a heavy weight to keep the pan flat and in position while welding.

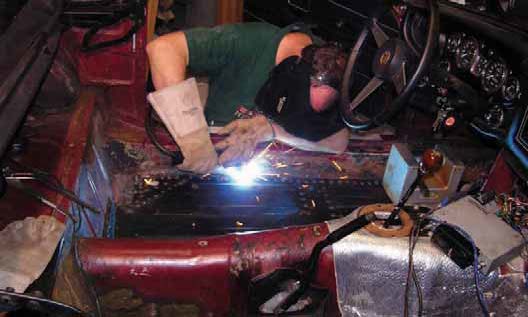
- Spot-weld the new panel in place. (Always have a fire extinguisher on hand—better to have it and not need it than the other way around.)

- After the pans were welded in, I sprayed their bottoms with undercoat, applying two coats at the seams. After a coat of primer was dry, I caulked the inside seams with a good butyl rubber caulk. (Do not use silicone caulk, which can release acetic acid as it dries.) I then used a high-quality primer on the interior surfaces of the pans and any bare metal.

- OE-style sound-deadening pads are asphalt-based and can be applied to clean floor pans. A more modern alternative that absorbs sound and offers heat resistance is Dynamat. This peel-and-stick dense foam material has a foil backing and can easily be cut with scissors.


'MGB Floor Pan Replacement' have 2 comments
May 1, 2018 @ 6:29 am Robin
Hey looks go and thanks for going through the steps + the tips on rubber caulking rathan silicone and the dynamat noise deadening mat
Cheers Robin
December 2, 2018 @ 10:15 pm Phil Maurice
Very encouraging, thank you.
It’s great to see cars maintained instead if being scrapped for no good reason.
Did you use a spotwelder or make mig spots?