


So your car is all jacked up and the rear brakes are in a million pieces! Okay, make sure that you have plenty of cold beer and now, let’s get that bad boy back together.
This is the opportune time to clean up that backing plate, which at this point can be easily removed and detailed. You might as well paint the brake drum, too, while you are at it. “Gloss black” engine spray paint works well and dries quickly. “Dull aluminum” paint looks pretty good on the hand brake lever. Don’t cheap out—purchase all new parts for the rest of the job. Now that everything is clean and shiny, it is time for…
 Reassembly:
1. Place the wheel cylinder into the back plate. New ones are so cheap that it is hardly worth rebuilding the old ones. If you must, then make sure that the bore is clean with no pitting and that the passages for the line and bleeder screw are unobstructed. If the wife is away, take the cylinders into the house and scrub them inside and out with a soapy Scotch-Brite pad in the kitchen sink. After they have been completely dried, use Girling Red brake grease for reassembly. Otherwise, a little brake fluid will work, but be careful not to get it on those freshly painted items.
2. Pass the brake line through the rubber dust cover and connect it to the cylinder. It is always easier to screw the connection into the cylinder while it is loose in its mounting. Sometimes a connector that has been over tightened will be hard to start because of flaring at its tip. A little bit of sanding or perhaps filing will reduce the end of the connector (not the line!) to its proper size.
3. Place the two smaller retaining clips on the back side of the cylinder with the tabs up. Do this from the lever side. Use a little chassis grease to lube the area. There will still be enough play at this point to allow the hand brake lever to slide into place. So do it!
4. Put a little chassis grease on the large (relatively speaking) retaining plate and slide it between the other two to lock the cylinder in place. It goes on in the opposite direction from the other two, and the notches on the end will engage the tabs on the bottom plate. This is probably easier said than done. Maybe a beer will help.
5. Now the rubber dust cover can be pulled over the hand brake lever and its square edge tucked under the larger retaining plate, which stands slightly off the back plate. Some cars have some little pegs on the inside of the back plate with felt spacers to steady the shoes. These are of dubious value, but if the felt is missing, a bit of ¼” fuel line can be cut to take their place.
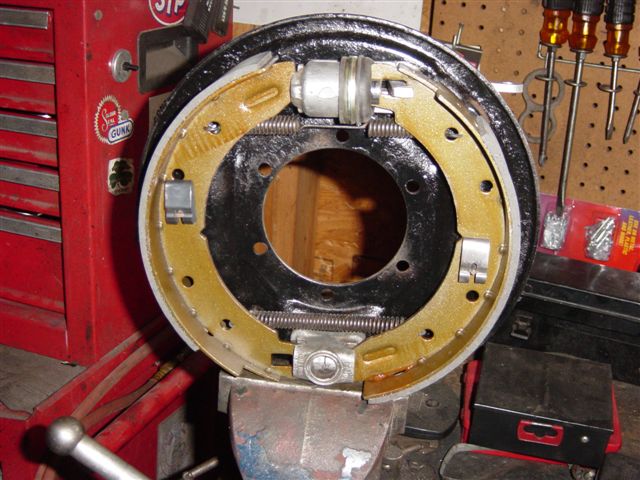
6. At this point the rehabilitated adjuster assembly should be in place with the adjuster bolt backed out. Go wash those filthy hands, then come back and set the new brake shoes side by side. Carefully position them so that the linings are symmetrical and the square hole that fits over the hand brake lever is where it needs to be. Place the springs on the shoes, with the spring with the straight piece in the middle on the wheel cylinder end. Hold the shoes apart so that the springs don’t fall off and set the square hole end over the brake lever and onto the cylinder. Carefully wrestle the other ends into place. I think you will find this method preferable to placing the springs on after the fact. Make sure the shoes are resting in the slots provided for them and not off to one side. Stand back and see that the shoes are centered…if not, a few taps with a rubber mallet will get things right.
 7. If you can still find them, push the two shoe retaining pegs in through the little holes in the back plate and secure them to the shoes with the spring clips. If you hold the peg in place from behind with one hand, you should be able to slide the clip into place (no twisting this time) with the other hand, using no tools. If not, you are a wimp!
8. The brake drum will go on easily now, since you have the adjuster backed off and the shoes on straight. Take care to have the quarter-inch countersunk screw holes lined up. Put the screws in just to show that you are paying attention to detail.
9. After verifying that the drum turns freely (if not, you are on your own), adjust the brakes up tight. Reconnect the hand brake linkage. Release the hand brake, first, damn it! If the hand brake has too much travel, now is the time to adjust it. Leave the drums adjusted tightly until after the system is bled…And here’s how you do that.
10. Finish six-pack.
By Mike McPhail
Gulf Coast Austin-Healey Club
Hill Country Triumph Club


'Pint Size Project — Rear Brakes — Reassembly' has 1 comment
October 2, 2012 @ 4:43 am Mike Moore
Those retaining clips are very difficult, wish I would have known about using a little grease before I did them, good tip.