


Fixing the friction, upgrading the flywheel
By Rob Mullner
The days of learning something via the “trial and error” method are rapidly disappearing now that the Internet can connect you with a person or a blog that’s done exactly what you are contemplating (no matter how strange or scintillating). Applying this phenomenon to the TR6, you can find step-by-step instructions on how to drop a V-8 into your Triumph as well as numerous images of ghastly scoops, flares, and other Bondo-induced horrors sprouting from these handsome classics.
Back when I had more available time than money, I learned how to replace my worn clutch since I couldn’t afford to take it to a real shop. After reading the Robert Bentley TR6 Workshop Manual for the tenth time (my favorite bedside companion for many years), I felt prepared to attack my first clutch job.
Much like surgery, the first step is a thorough cleaning of the patient, so I removed all of my maps, papers, books, and cassettes. Then I delicately removed the snapped-in sections of carpeting, laying them out in a neat pile. With the clutch nearly in my sights, I disconnected the battery, unplugged the spindly, dried-out wires behind the courtesy light switch and the radio power and antennae leads, and removed the center tunnel support. After removing the bolts securing the seats to the floor tracks and putting them gently on the floor, I was staring at a big hunk of cardboard. Upon removing the bolts, washers, and metal-plate hardware, the oil-soaked cardboard tunnel came free.
Once the transmission is out of the car, we recommend carefully disassembling and cleaning the following:
- Clutch release-fork securing pin—this is tricky because the pin’s square head usually twists off its threaded body. Consider using one of Moss’s upgraded pins each time you replace the clutch.
- Remove the bolt holding the shaft in place on the right side of the bell housing.
- The clutch release fork has two small bearings that the throw-out bearing travels on—make sure that these bearings and the grooves of the throw-out bearing’s sleeve aren’t damaged, which will increase the amount of effort required to engage the clutch. Take the sleeve and a new throw-out bearing to your local machine shop to have it pressed onto the brass sleeve.
- The shaft the fork attaches to should be cleaned, the ends where it engages the transmission should be examined for wear, and the bushings they ride on should be replaced. Don’t lose the spring that sits between the outside edge of the clutch shaft and the left side of the transmission.
- This is also an opportune time to change the oil.
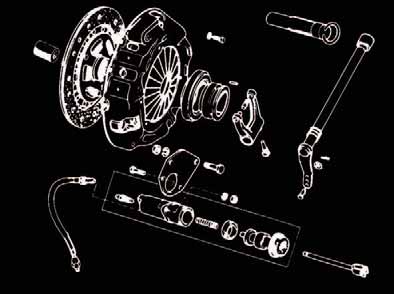
Clutch & Flywheel Options
Moss has various clutch and flywheel options. Clutch-assembly offerings are Borg & Beck (an OE supplier) and LUK, which acquired Laycock, another OE TR6 supplier. Enthusiasts generally feel that the Borg & Beck pressure-plate spring tension is higher and thus better suited for modified-engine applications. Another difference is that Borg & Beck pressure plate and discs are available separately, while LUK only offers a complete assembly. Also, Moss doesn’t recommend mixing and matching LUK and Borg & Beck components.
For the flywheel, if the existing unit looks unmarred, you might be able to reuse it as-is. However, having the flywheel resurfaced by a machine shop or replacing a worn one with a new unit is always recommended.
Another alternative is to “restomod” your Triumph with Moss’s trick aluminum flywheel. Weighing only 11 pounds compared to the stock 33-pound piece, the aluminum flywheel is one of those beautiful parts that nobody sees. It’s CNC-machined to aerospace standards, has a replaceable wear surface, and comes with the starter ring-gear attached. The benefit is improved throttle response—the engine has less weight to overcome. The tradeoff is a slight increase in noise (less mass to absorb sound and vibration).
Re-Entry
To reinstall the trans, first smear a dab of lithium grease on the nose of its input shaft. Then ensure that the engine and transmission bolt holes are on the same plane by gently lifting the backend of the engine with a floor jack if necessary (a wood block under the oil pan works nicely). Once engine and trans are level, they’ll mate with little effort. Use the tail-mounting bolts to hold the transmission to the chassis, then install the four driveshaft fasteners and the other nuts and bolts that secure the engine and gearbox. Don’t forget to re-install the speedo cable and clutch slave pushrod pin and cotter key.
If you have a hydraulic bleeder, you can bleed the clutch yourself. If not, ask a friend to pump the clutch a few times while you bleed the slave cylinder. (Servicing clutch hydraulics is beyond our scope here.) Finally, reinstall the carpet, seats, and dash support and reconnect the wires where you found them. Then you can enjoy your new clutch.
- Prep steps include removing a seat for easier access, removing the carpet and trans tunnel, and raising and securing the car.

- Unbolt the driveshaft from the trans output shaft, then remove the two bolts that mount the transmission’s tail to the chassis.

- Strip the transmission by removing the 17 fasteners of various sizes and lengths. You’ll also need to disconnect the speedo cable and the pin securing the clutch slave cylinder pushrod to the transmission cross-shaft from the left side of the transmission. Also, secure the starter and clutch slave cylinder, which are soon to be homeless.

- Two bolts on the bell housing are obscured by the bulkhead. Then the transmission can be clean-and-jerked out through the top.

- Remove the six bolts that hold the clutch cover to the flywheel. Then, the pressure plate and disc pop off with minimal effort.

- Remove the four bolts that hold the flywheel on the crankshaft. Resurfacing or replacing the flywheel is always recommended, as is using a new pilot bushing.

- Here’s Moss’s lightweight aluminum flywheel, which installs the same as the stock unit. The new clutch assembly bolts up by using the required alignment tool and torqueing the six bolts in a star pattern per the instructions’ specs.

- Triumph transmission guru Herman van den Akker recommends a belt and suspender safety solution for the strength pin (blue arrow). Here, a new Moss high-strength pin is bolstered by a second pin (pink arrow), then both are safety-wired. Note the lithium grease on the trans input shaft.

- Consider upgrading to a modern plastic transmission tunnel cover and seal kit. Paper (cardboard) versus plastic—the difference is obvious with a better seal that keeps out more noise and fumes.


'TR6 Clutch Replacement' have 2 comments
February 23, 2022 @ 8:24 am tj
what is the install time on a clutch for a 1971 triumph tr6
April 30, 2022 @ 12:54 pm Greg waters
Where do we get the hvda conversion replacement disc and plate