


By Mike McPhail
When I got my barn-find Healey 100 back in the 20th Century, it had been off the road for a long time. One of the many non-operative components to be dealt with was the wiper motor. Okay, what do you expect to get for $3500?
Applying 12 volts to the wiper motor on the bench pegged the needle on my battery charger, so to avoid meltdown, the clips were quickly removed. The ancient contraption had not even budged. Removing the cover revealed a pristine mechanism and little wear on the brushes. The grease had turned to glue, paralyzing the gadget!
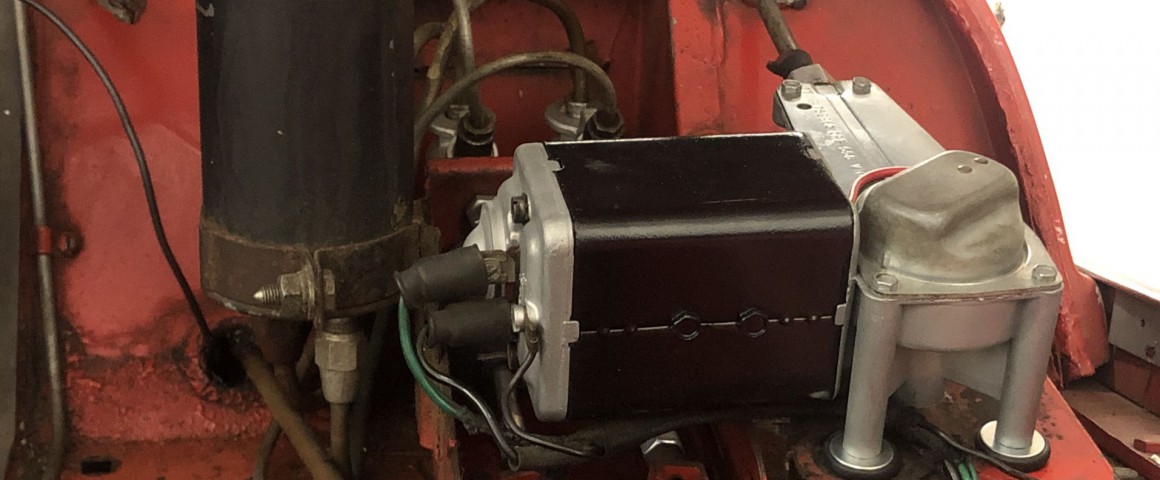
A thorough cleaning in mineral spirits had the wipers running like new. These old wiper motors are very simple and can often be made to work well with a minimum of effort. However, if you have a luxury car like an Audi, it’s better to leave it to the experts that do Audi Auto Repair or to trusted auto body repair shops in your area. The first thing to check is the operation of the wiper linkage. Unscrew the nut that attaches the wiper motor to the tube that houses the cable. Remove the three little nuts holding the motor to the body and disconnect the wiring, noting which wire goes where. On all but very early cars, the green-black wire connects to terminal 1 and the green wire goes on terminal 2. The black wire is chassis ground and connects to the cover screw marked “E”. More than one model of wiper motor was used over the years, but they are all quite similar.
With the wiper arms removed, the entire wiper motor assembly should easily pull out of the tube, spinning the wheel boxes as it goes. Difficulty in this operation would indicate a severe shortage of grease, or even worse, bent tubes. The tubes can become bent when the chrome nuts holding the wheel boxes defy removal. Bent tubes can be straightened by driving a suitable sized Phillips screwdriver into the end. The kink will only be at the ends near the wheel boxes. Be sure that you note the position of the tubes and wheel boxes for correct reassembly.
Once the cable can be reinserted and removed with ease, direct your attention to the motor itself. Apply 12 volts to terminal 2 and ground to terminal 1 with the cable attached. The cable should move in and out of the motor without much drama. If you are using an old timey charger for power, expect to draw about three amps. If you have one of those fancy six-cylinder Healeys, or a Sprite, check the parking mechanism by removing the ground when the cable is half extended. The motor should park when ground is subsequently attached to the motor body.
Of course, you probably wouldn’t be doing this if the dumb thing was working! So, grab a cold one and let’s take this contraption apart.
- Use a nut driver to remove the four screws holding the gearbox cover, exposing the drive mechanism.

- Go ahead and cut the rotten old wire to the parking adjustment… that’s the cap that spins around letting you stop the wiper arms anywhere in the sweep. Consider marking the position of the cap, since you really don’t want to change it much.On most models, there is a copper brush that grounds the wire on the cap to keep the motor running after the dash switch is turned off. This is how the park feature works. Sometimes the brush breaks off or has been lost. I have one or two old motors that work fine, except for this missing component. The Healey Hundred never had a parking feature, and it is kind of fun to see if I can work the switch just right to park the wipers. But I digress.

- Next, you’re going to pull the e-clip and remove the brush, after which the cable and connecting rod can be removed. The gear should come out in order to thoroughly clean it and the case. To do this, just turn the case over and drive out the little circlip with a small punch. Pop out the gear and move on to the motor.

- There are two long machine screws through the cover plate that hold the motor onto the gearbox case. Remove these (and the terminal screws) and the cover will come off easily, exposing the armature and brush holders. Pulling the motor case away from the gearbox will now send the armature crashing to the floor, and the brush holders flying.

- Had you not lost them, you would have found two tiny graphite brushes in the silver-plated holders, connected by a pair of microscopic insulators and an incredibly fragile little spring. Take another round trip to the fridge, then begin searching for the lost parts, as they will definitely be needed for re-installation. Check the resistance between terminals 1 and 2, expecting about 12 Ohms. There should be no continuity between the terminals and the case. Passing the multi-meter test means there is a distinct possibility that you will be able to drive in the rain again. You’re almost done! Clean up the commutator and solder a new parking wire to the motor, routing it around the field coil so as to line up with the little hole in the gearbox body. Replace the brushes with Moss 554-035.

- Carefully reassemble the motor. Replacing the brush holders will require a steady hand, good lighting, and a kiss from lady luck. The steel motor body should be painted before reassembly and grease applied to friction areas. There is an adjustment for armature end play that probably won’t be needed, unless you lost some more of those tiny parts. Solder the new wire to the cap and test the assembly one more time, then do a little rain dance. You’re ready for it!


'Wiper Motor Repair' have 3 comments
October 29, 2021 @ 3:17 pm Harry Kumpis
The wire to the parking adjustment was cut during the disassembly but replacing it during the reassembly was not addressed. Do you replace it or not? If so what is the procedure? The insulation is completely gone from my unit. Thanks
November 19, 2021 @ 7:09 pm Evan Parent
Just replace the wire with a nice new piece of insulated stranded wire of the same gauge. 18 gauge should be fine. Un-solder the old wire and replace it with the new one.
May 1, 2022 @ 5:27 am Tim Ballingall
just new to this find…
On the DR3A, there is a copper strip that works as an auto park switch – do you guys sell them ? i fear i will need to make one up